Wine Cellar cooling units are available in a variety of configurations. It is important to consider the location and size of your wine cellar when choosing the best cooling unit for your space. Like home air conditioners, cooling units cool the air in the room and remove (exhaust) the hot air. Insulation and vapor barriers are also important considerations when purchasing your cooling unit.
Let’s build your dream wine cellar together!
Call Now! 800-231-9463

Free Consultation
Call Wine Appreciation for your free consultation. We can help answer your questions about how to conserve energy, stabilize temperatures and control humidity. Call Now! 800-231-9463

Design & Build Experts
Our “wine guy” experts will create your custom design. We can recommend framing and insulation materials, electrical and plumbing requirements, cellar access and lighting options.
Space Planning Assistance
Identify the purpose of your wine cellar. Determine your wine storage needs now and for the future. Choose the best location for your wine cellar.
Expert Wine Cellar Design & Cooling
With nearly 5 decades working throughout San Francisco Bay Area, Napa, Sonoma, Sacramento and greater Northern California, we at Wine Appreciation pride ourselves as custom wine storage design specialists. We are experts in commercial and residential custom wine cellar design and cooling. Whether you, or your customers, need to store 12 bottles or 100,000+ bottles, Wine Appreciation has the custom wine cellar design and cooling expertise you can trust.
Customizing a space for a wine cellar or wine storage can be tricky. Rest assured, with our selection in traditional wood or contemporary metal and acrylic racking systems, you have many options tailored to fit your wine collection, budget and décor. Leave the work to us! Our specialists will walk you through design and installation. We personally service most of Northern California for on-site visits and we can help coordinate your commercial or residential custom wine cellar project if you are outside of our service area. Call us today for a free consultation!
Next Steps
Design and build considerations for your custom wine cellar
Identify Your Wine Cellar Purpose
- Display vs Storage
- Short Term vs Long Term
- Investment for resale
- Maybe you like collecting things
- Quantity of bottles now and in future
- Types of Wine (Dessert and German bottles have different shapes)
Determine Wine Cellar Size
Cellar size is determined by bottle count, available space, or a combination of both. If you have the option of building within a larger space then you will want to follow the concept of “just large enough to fit the wine”. Cooling costs money and cooling concrete and large empty space is more costly than you might think. A medium size cellar might require 1000 watts when cooling unit is on. In San Francisco we pay $0.23/1000watts/hour. So if cooling runs 50% of the time you pay $83.00 before taxes/month. This is the incentive to make an efficient, well insulated space. The more efficient the cellar, the less it will cost to run, the longer the cooling equipment will last, the less noise it will make, and the better it is for environmental reasons. Wine Appreciation can assist you in determining what you will need regarding space, materials and approximate costs for your new cellar.
Choose Your Wine Cellar Location
Location in not typically an option, however, if you have several potential areas then there are some considerations to make. Start with cooling. How can I cool this space when the room is in the center of the home? It’s not easy and this is the first hurdle. Naturally cool areas with low heat load are preferred; ground level rooms, basements, and garages are frequently used. You want to ensure that your location will allow mechanical cooling. Passive cellars do exist and are usually below grade on 2-3 walls.
Wine Cellar Temperature
Wine Cellar temperature is typically 55 degrees and humidity safely above 50%. Is a warmer temperature necessarily bad? This has yet to be proven but we can all agree that stabile temperature is more important than the difference between 55 & 58 degrees. A set temperature of 60 degrees may save over 50% in electricity costs vs 55 degrees.
Humidity Control
Your wine cellar should maintain certain temperature range and humidity levels while the rest of your home may be kept at another temperature. However, when you cool one part of the home (wine cellar), the moisture or humidity from the warmer area (rest of home) will gravitate and condensate upon contact with the much cooler one (wine cellar). A barrier is required to separate the two opposing environments to prevent condensation from building up in your walls which can cause materials to decay. Installation of a vapor barrier prevents the warm air from moving to the cooler area within your wine cellars and disrupting ideal wine storage conditions. The importance of humidity cannot be overlooked in your wine cellar. Humidification is the process of adding moisture into the air. Proper humidity levels are often overlooked during the wine cellar building process, but their importance is paramount for proper wine preservation.
Wine Cellar Framing and Insulation
Framing out your wine cellar is the initial step in the building process. Here are some guidelines to follow:
- More insulation is always better but the gains between 6” and 12” wall thickness is minimal.
- 2″X4″ wood studs are typical, but a 2″x6″ wall cavity is better.
- Exposed concrete is risky and should be isolated with a foam panel. If the concrete temperature is warmer than your cellar set temperature, then your cooling equipment will have to cool the concrete as well as the cellar.
- Floors, often overlooked with slab on grade can be framed with furring strips and insulated.
- The vapor barrier must be installed in the joist space to form a complete seal. Closed cell foam insulation does both.
- The entire wine cellar should be insulated to conserve energy, stabilize temperatures and control humidity. Minimum insulation is: — 3½ inches (9 cm) in walls — 6 inches (15 cm) in ceiling — More insulation is better
Determine Your Materials
Once your cellar is framed, sealed, insulated and all electrical and plumbing has been roughed in, you will select your wall, ceiling, and flooring materials. You will want a moisture resistant drywall/plywood material for the wine cellar walls and ceiling. 1/2″ - 5/8” moisture-resistant gypsum wall board called green board is most common and cost effective; now available is purple sheet rock which offers mold and mildew resistant and a better alternative. If the planned racking relies being bolted to the wall consider a plywood substrate under the sheetrock. Moisture resistant hardwoods are beautiful and require no long-term maintenance. Wood paneling is another option. There are a variety of flooring options ranging from stone, tile to wood options. Insulated floors are highly recommended. Please consider a water resistant or waterproof floor as cooling generates condensation and no matter what you do you have a potential of water leaking on the floor.
Choose Your Entry Door
Your wine cellar door is very important. Important in the sense of being energy efficient. Frameless and plate glass enclosures should never be used for a temperature-controlled space. The cellar door look and appearance leaves a lasting impression for your home visitors. These doors also help in maintaining the ideal environment within the cellar. Wine cellar doors should be exterior grade with weather stripping for a tight seal. If using a glass door, you want to ensure that the door includes high R-Value glass panels.
Lighting
Use dimmable, recessed lighting in the ceiling. Hanging chandelier lights in conjunction are fine. LED low heat lighting is common and low energy lamps are required by code in most states.
Choosing a Cooling System
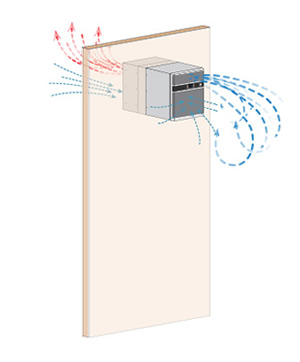
Self-contained cooling system
This system is the most cost effective and the easiest to install . The unit is intended to mount between the studs of a current wall and does not require a license from an installation technician.
Self-contained units house the evaporator and condenser together. One side of the unit will blow cool air into your wine cellar, whilst the other side will absorb the heat from your cellar and exhaust it into an area which is adjacent to your cellar.
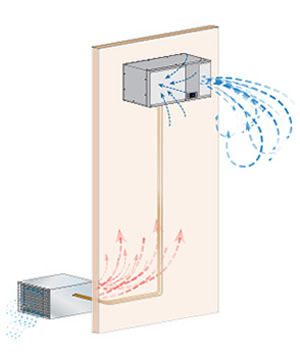
Split cooling system
This type of system will be a quieter and, likely, a more efficient way to cool your cellar .
Split cooling system condensers are typically noisy, though, and will need significant space for ventilation, so the location of your cellar may not include an area for these functions.
If you use a split cooling system, the evaporator and condenser come in two parts. Therefore, the condenser can be placed outside or in a separate room which is more suited for the heat and noise dissipation, such as a basement, roof-top or garage. Then, the quiet evaporator can be installed inside or around the wine cellar.
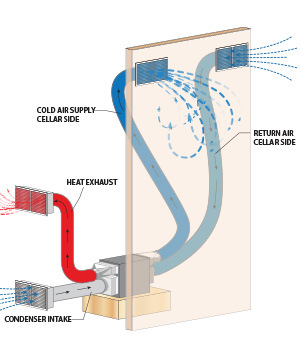
Ducted cooling system
This system can be a self-contained or split cooling system and you usually have more flexibility and insulation options available to you.
The cooling unit can be placed up to 25 (ducted) feet from your wine cellar with the cool air flowing from the cellar and the heat exhaust ducted to the outside of your home. Ducted cooling systems are usually more of an aesthetic choice for wine collectors who would rather not see a cooling unit in their cellar.